📤 Local Library Development with Nx Release and Verdaccio
Automating Your Workflow with Custom Scripts and Verdaccio in Nx Environments

Who am I? Whether it's as a Software Engineer, Tech Lead, or Architect, if it involves software development, I'm in! My journey began in the realm of Java development, but I fully transitioned into the universe of JavaScript/TypeScript and its exciting toolset. I support companies through their software development cycle challenges by utilizing Nx monorepos, micro frontends, robust testing strategies, and a touch of Extreme Programming philosophy. Every day for me is like waiting for the next episode of my favorite series—filled with learning, sharing, and growing together. Indeed, I'm as passionate about coaching and sharing knowledge as I am about coding. I am the father of two incredible boys, and I am endlessly grateful to my wife for supporting my passion every day.
Nx offers everything you need to develop and publish your NPM packages efficiently. It provides a structured environment and essential tooling, including Verdaccio for local publishing and the innovative Nx Release system.
In my previous article, 🍒 Cherry-Picked Nx v18.1 Updates, I highlighted how the custom publish.mjs will now be replaced by the Nx Release for managing publishable libraries.
Nx Release is mainly achieving three main phases:
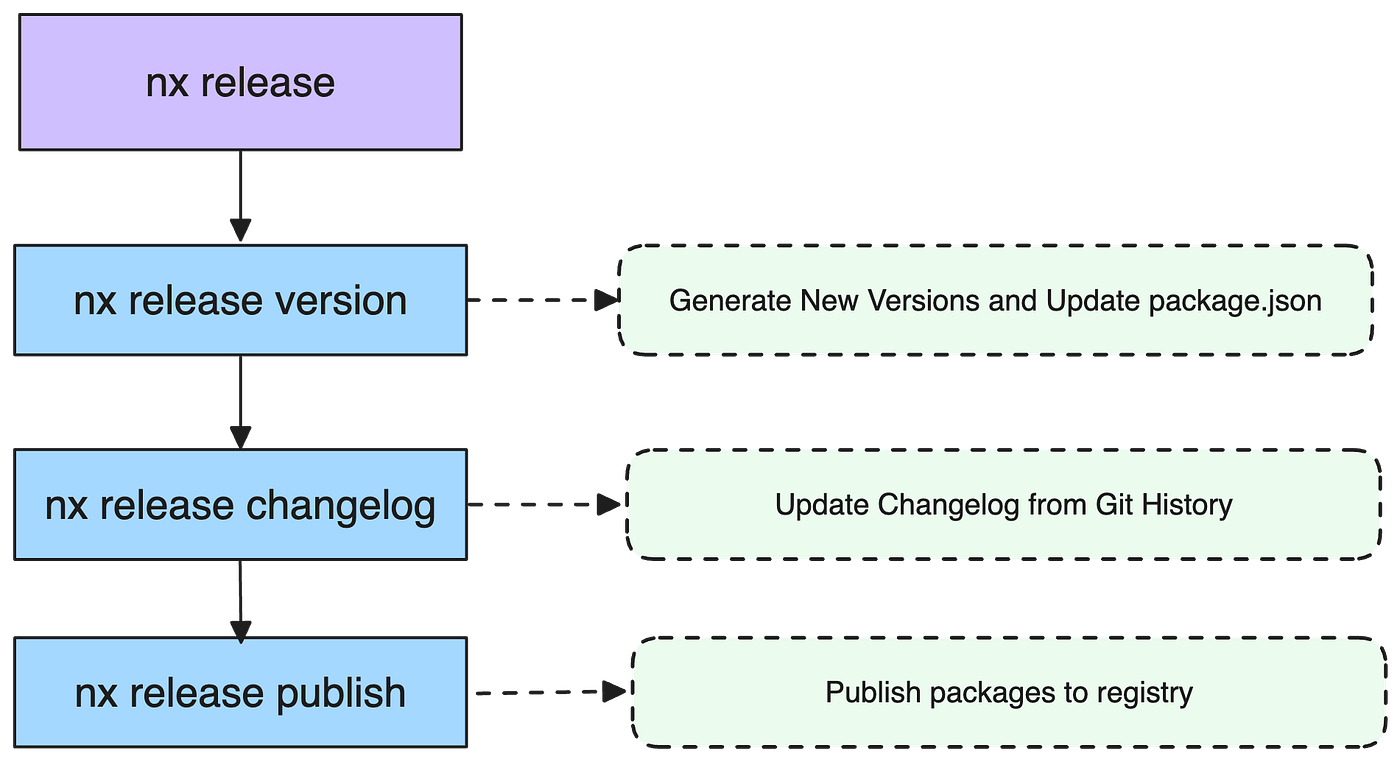
For those unfamiliar with Nx Release, I recommend:
Reading Juri Strumpflohner’s article: Versioning and Releasing Packages in a Monorepo.
In that short article, I wanted to share insights on utilizing the new system alongside Verdaccio for the local development of publishable libraries.
Practical Use Case
To begin, create an empty Nx Workspace with the following command:
npx create-nx-workspace@latest myorg --preset empty --workspaceType integrated --nxCloud skip && cd myorg
Next, add the @nx/js plugin feature:
nx add @nx/js
Finally, create the publishable library you wish to develop:
nx g @nx/js:lib my-lib --publishable --importPath=@myorg/my-lib
What happened?
Upon generating the publishable library, Nx installs and configures all necessary tooling for your workspace, preparing it for publication.
Verdaccio Setup
Nx automatically configures Verdaccio on your workspace using @nx/js:setup-verdaccio, resulting in a root project.json with the following configuration:
{
  "name": "@my-org/source",
  "$schema": "node_modules/nx/schemas/project-schema.json",
  "targets": {
    "local-registry": {
      "executor": "@nx/js:verdaccio",
      "options": {
        "port": 4873,
        "config": ".verdaccio/config.yml",
        "storage": "tmp/local-registry/storage"
      }
    }
  }
}
This configuration enables the local Verdaccio registry to run on port 4873, using the specified storage and configuration paths. You can start Verdaccio using:
nx run local-registry
Nx Global Configuration
Nx also sets up the Nx Release globally in your nx.json:
{
  "release": {
    "version": {
      "preVersionCommand": "npx nx run-many -t build"
    }
  }
}
The preVersionCommand ensures that builds or other tasks are completed before version updating.
Project Configuration
Finally, your library project configuration will include Nx Release-specific settings and a target nx-release-publish for running the release:
{
  "name": "my-lib",
  "targets": {
    "build": {...},
    "nx-release-publish": {
      "options": {
        "packageRoot": "dist/{projectRoot}"
      }
    }
  },
  "release": {
    "version": {
      "generatorOptions": {
        "packageRoot": "dist/{projectRoot}",
        "currentVersionResolver": "git-tag"
      }
    }
  }
}
You can now seamlessly publish your library using:
nx release
Local Development Flow
If you want to test your library locally, on another local repository, for example, you will have to follow the steps:
Start Verdaccio:
nx run local-registryBuild your Libraries: Automated by Nx Release using the
preVersionCommandinnx.json.Update Versions in Outputs: Automated by Nx Release with the generator
@nx/js:release-version.Publish Library on Verdaccio: Automated by Nx Release using
@nx/js:release-publishand the generated targetnx-release-publish.Install your Libraries:
npm install @my-org/my-lib@latest
Working locally can become repetitive and tedious, especially when needing to create a unique version each time; otherwise, Nx Release will refuse to publish the same version again. Additionally, I prefer not to complicate my workflow by including an unpublish step.
In the Nx documentation, two particularly interesting examples are highlighted: Using the programmatic API for Nx release and Update Your Local Registry. These examples demonstrate how you can craft a custom script to enhance the standard Nx Release process.
To cover the entire process mentioned above, I implemented a custom script tools/scripts/publish-local.ts:
// Related to the target generated in the root project.json
const localRegistryTarget = '@myorg/source:local-registry';

// Callback used to stop Verdaccio process
let stopLocalRegistry = () => {};

(async () => {
  // Get Options From Execution
  const options = await yargs
    .version(false) // don't use the default meaning of version in yargs
    .option('version', {
      description:
        'Explicit version specifier to use, if overriding conventional commits',
      type: 'string',
      default: `0.0.0-local.${Date.now()}`, // the version will be always unique
    })
    .option('targetPath', {
      description:
        'Relative path to the repo where to install the published libraries',
      type: 'string',
      default: '',
    })
    .parseAsync();

  /**
   * Step 1: Start Verdaccio
   */
  stopLocalRegistry = await startLocalRegistry({
    localRegistryTarget,
    verbose: false,
  });

  /**
   * Step 2: Build your Libraries
   * Step 3: Update Versions in Outputs
   */
  const { projectsVersionData } = await releaseVersion({
    specifier: options.version,
    stageChanges: false,
    gitCommit: false,
    gitTag: false,
    firstRelease: true,
    generatorOptionsOverrides: {
      skipLockFileUpdate: true,
    },
  });

  /**
   * Step 4: Publish Library on Verdaccio
   */
  const publishStatus = await releasePublish({
    firstRelease: true,
  });

  /**
   * Step 5: Install your Libraries
   */
  // Get All published Npm packages that should be installed
  const packagesToInstall = Object.entries(projectsVersionData).map(
    ([projectName, { newVersion }]) => {
      const project = readCachedProjectGraph().nodes[projectName];

      const packageJson = JSON.parse(
        readFileSync(
          resolve(process.cwd(), project.data.root, `package.json`)
        ).toString()
      );

      return `${packageJson.name}@${newVersion}`;
    }
  );

  // Prepare the install command
  const targetPath = resolve(process.cwd(), options.targetPath);
  const installCommand = `${getInstallCommand(
    targetPath
  )} ${packagesToInstall.join(' ')} --registry=http://localhost:4873`;

  console.log(installCommand);

  // Locate to target dir and run the install command
  process.chdir(targetPath);
  execSync(installCommand);

  /**
   * Final: When installation is done, no need to have Verdaccio
   */
  stopLocalRegistry();

  process.exit(publishStatus);
})().catch((e) => {
  // If anything goes wrong, stop Verdaccio
  console.error(e);
  stopLocalRegistry();
  process.exit(1);
});

// Used to define which install command should be used on the targetPath
function getInstallCommand(targetPath: string): string {
  const siblingFiles = readdirSync(targetPath);

  if (siblingFiles.includes('yarn.lock')) {
    return 'yarn add';
  }
  if (siblingFiles.includes('package-lock.json')) {
    return 'npm install';
  }
  if (siblingFiles.includes('pnpm-lock.yaml')) {
    return 'pnpm add';
  }
  throw new Error(
    `No package manager found for target repository: ${targetPath}`
  );
}
You can now publish your packages locally just by running:
npx ts-node ./tools/scripts/publish-local.ts --targetPath ../app-using-my-lib
Final Thoughts
It is always difficult when you want to test a publishable library locally. Nx provides all the tooling you need to support you in that process.
However, it is up to everyone to decide whether you want to use that tooling manually or simply automate it by using a custom script.
In this article, I propose one way, but I highly recommend adapting it to create your own way.
🚀 Stay Tuned!


