💡 10 Tips for Successful Nx Plugin Architecture
Insights from Using Nx Plugin Architecture in Monorepos
Table of contents
- 1. Start Using Nx Plugins
- 2. Use Inference over Generators, Executors, and Migrations
- 3. Adopt Secondary Entry Points
- 4. Use a Simple File over an Nx Plugin Library
- 5. Nested Nx Plugins
- 6. List Affected Projects by an Nx Plugin
- 7. Explore Nx Core Plugins
- 8. Use Multiple Layers of Nx Plugins
- 9. Create Reusable Utilities for Your Plugins
- 10. Project-centric or File-centric
- Summary
- Resources
Nx provides many features, and I often see that Nx users don’t know or are afraid of extending Nx by implementing Nx Plugins.
I’ve worked on many different Monorepos (large, small, distributed, etc.), and setting up an Nx plugin architecture has helped me solve many issues. It simplifies Nx maintenance and facilitates unifying the workflow for different technologies and teams.
In this article, I simply want to write down some tips that help in implementing Nx Plugins efficiently.
1. Start Using Nx Plugins
Are you creating reusable functions? Are you creating utilities? If yes, then this is exactly what Nx Plugins are used for in the Nx ecosystem.
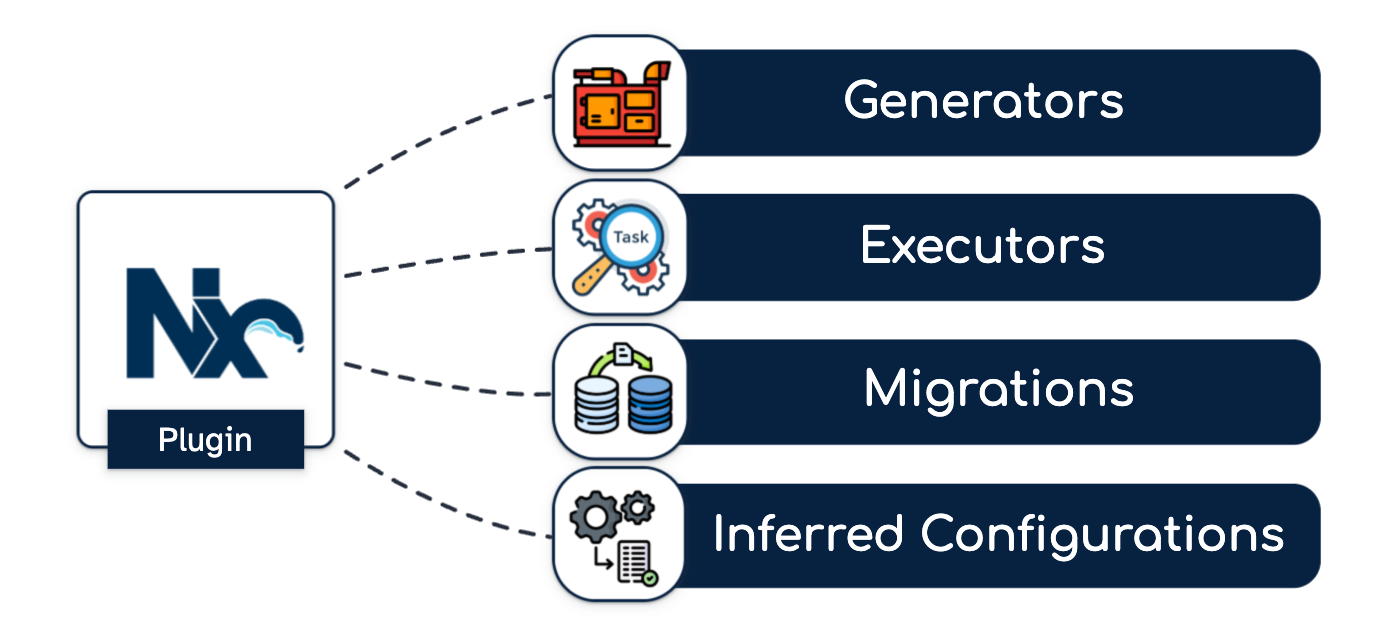
I often see that Nx users are afraid and consider Nx Plugins as advanced configuration. However, they are working on complex monorepos with duplicated configurations.
If you want to know more about what Nx plugins can bring, I encourage you to look at my following article:
2. Use Inference over Generators, Executors, and Migrations
Before Nx Project Crystal existed, plugins were limited to customizing:
Generators: by generating custom files and configurations when generating a project.
Executors: by integrating custom code to execute when running a task.
Migrations: by running generators when upgrading a distributed repository.
Since Nx Project Crystal, many customizations can be simply removed:
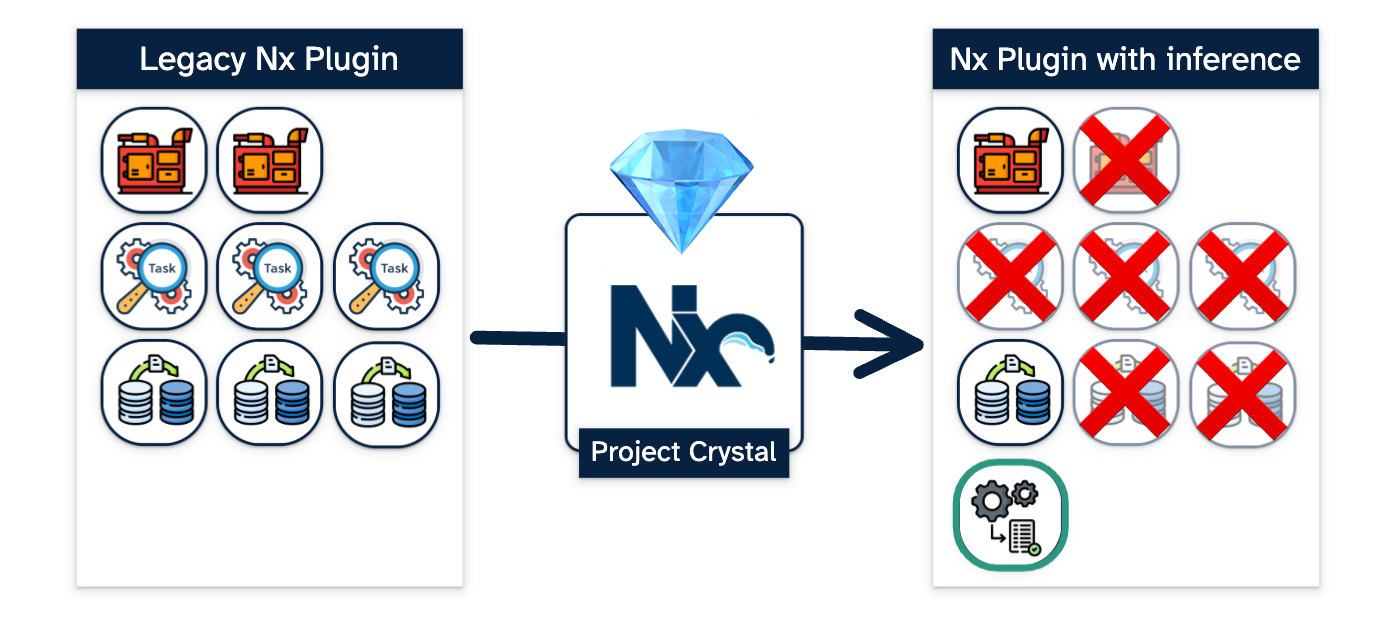
Generators Simplification
They become simpler because custom configurations are handled within the plugin itself:
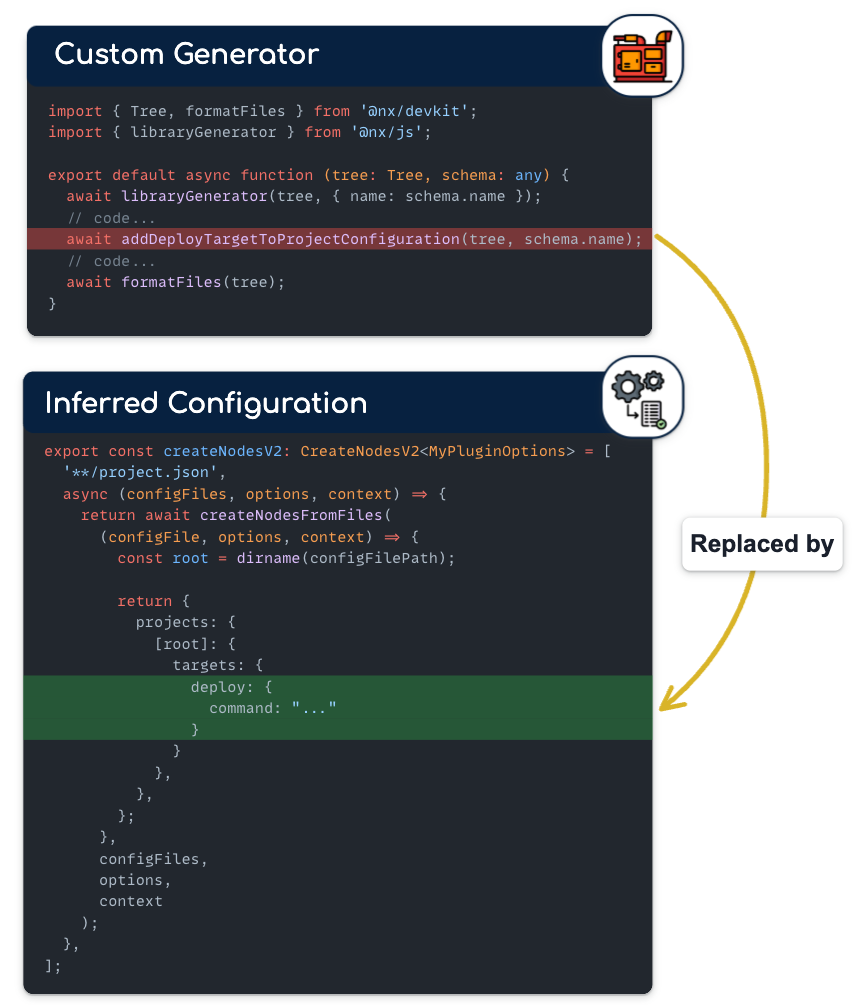
For example, you don’t need to use generators for generating project configuration because it will be supported by your plugin directly. For some use cases, you can even delete the custom generator and use the core Nx Plugin.
Remove Executors
Instead of writing a custom executor, you can now execute custom Nx commands or set custom configurations based on the project:
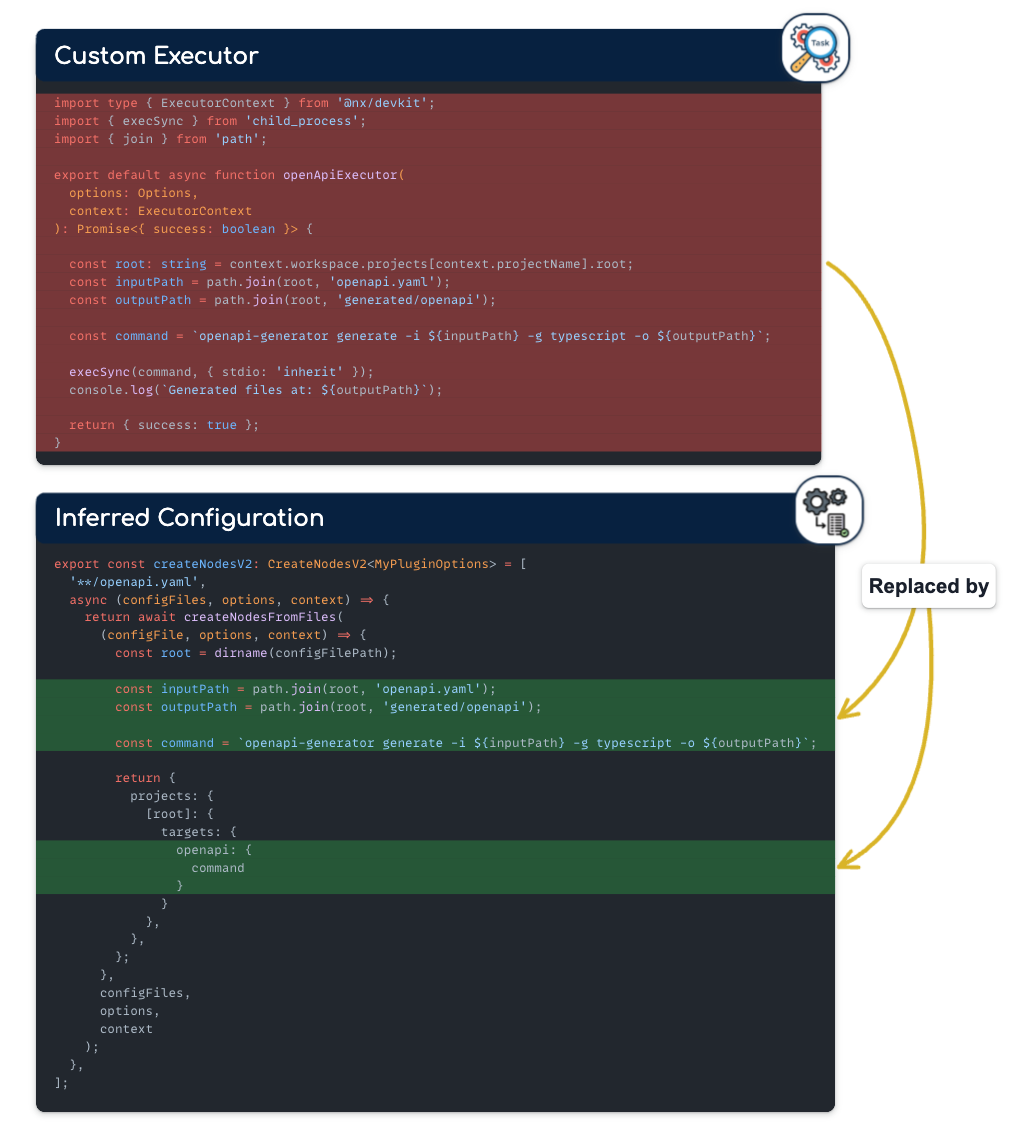
For example, if you previously needed an executor to generate types at the root of your project, such as “executor”: “@org/openapi:typescript”, it is no longer required. This functionality can now be automatically handled by your plugin, @org/openapi/plugin.
Remove Migrations
Fewer migrations are needed. In fact, instead of running migrations on distributed repositories, you just need to update the plugins, and you’ll get all new configurations for free.
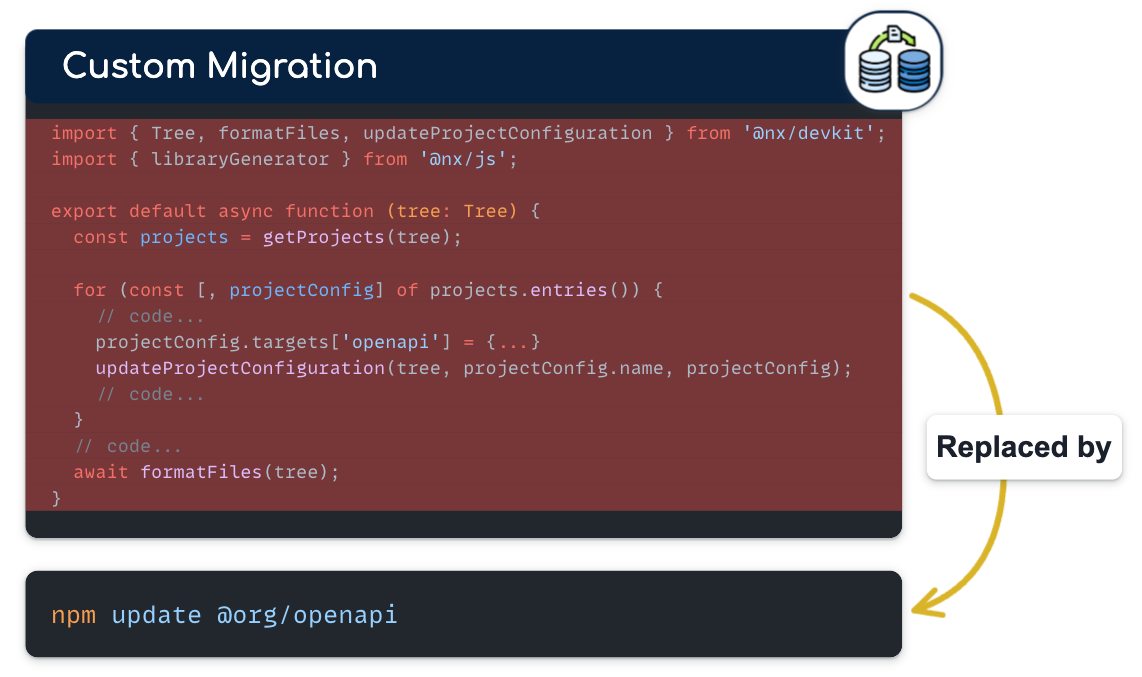
For example, if you needed to update project configurations during an upgrade, you can now simply update your project with the new version of the Nx plugins, and you’ll automatically get the updated inferred configuration.
3. Adopt Secondary Entry Points
An Nx plugin can serve multiple features (generators, executors, inference, etc.). And all of these features will be used:
Independently: The executors will be called when running a task, the generators/migrations on demand, and the inference automatically when generating the graph.
In different use cases: You can use local Nx plugins or directly from an npm package. You can also import existing Nx Plugins by creating your custom one.
🚫 If you mix and expose all of these features in one big barrel file, you can import undesired libraries and have performance issues when using them:
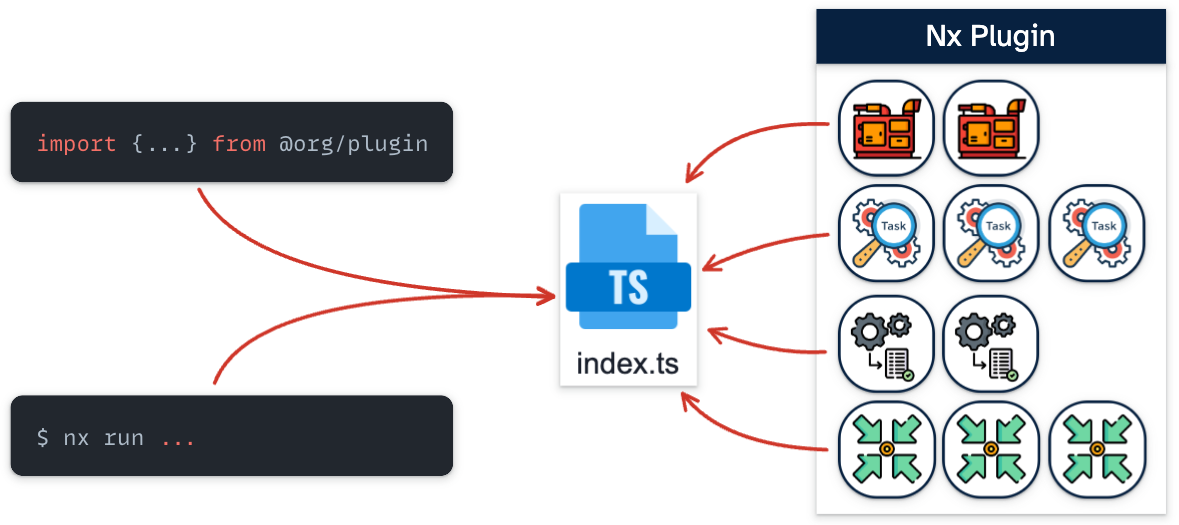
When using local plugins, Nx compiles the entire plugin code at runtime, even if only a single plugin is being used.
✅ It is important to have one entry point for each feature especially for inferred configurations:
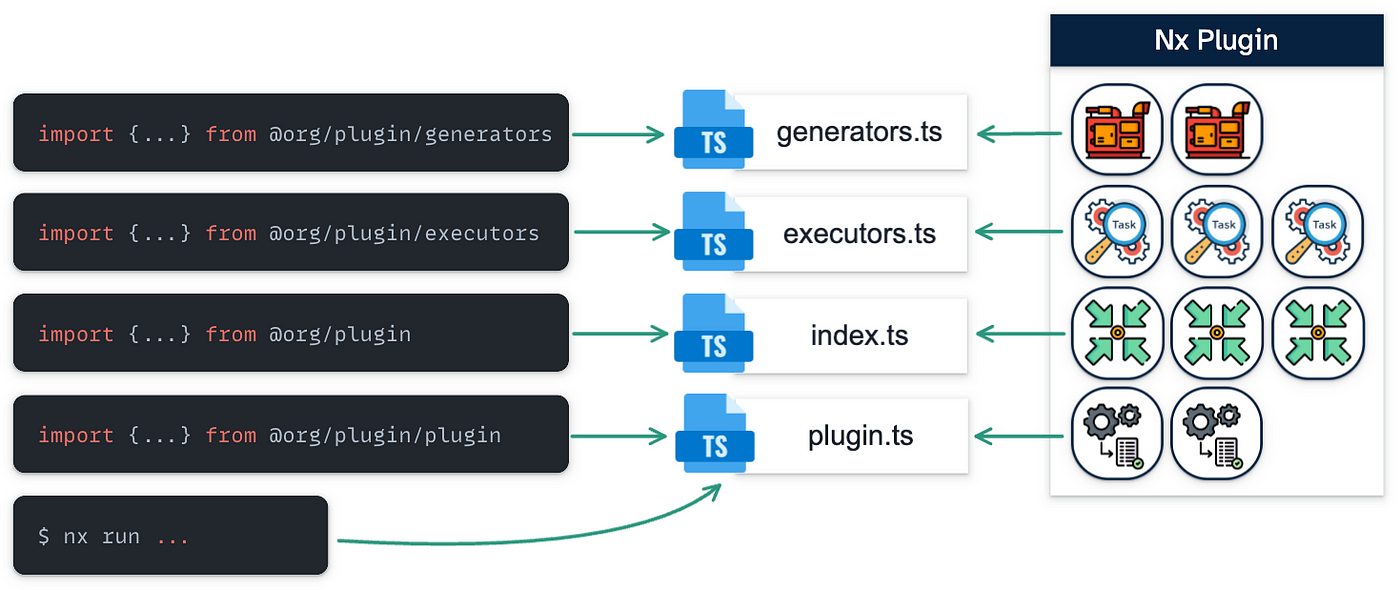
One Nx core plugin that really well illustrates this approach is the @nx/angular package.
⚠️ For the moment, it is not possible to use secondary entry points for local inferences. More information in the following discussion:
4. Use a Simple File over an Nx Plugin Library
You don’t need to create a library just for using inference. You can declare simple files in your nx.json plugins:
{
  "$schema": "packages/nx/schemas/nx-schema.json",
  ...
  "plugins": [
    "./tools/plugins/my-plugin.ts",
    "./libs/my-plugin/plugin.ts"
  ],
...
}
Directly related to the Tip 3. Adopt Secondary Entry Points, by specifying a simple file, you’ll avoid having to compile an entire library and allow better granularity for your inferred configurations.
5. Nested Nx Plugins
Like any library, it is recommended to structure your project per domain. This concept should also apply to your plugin architecture. However, it is not possible today to generate multiple type of configurations for one plugin.
The alternative is to use a more generic pattern. This approach allows you to trigger the plugin for multiple types of files and then route each file to a specific subset of configurations.
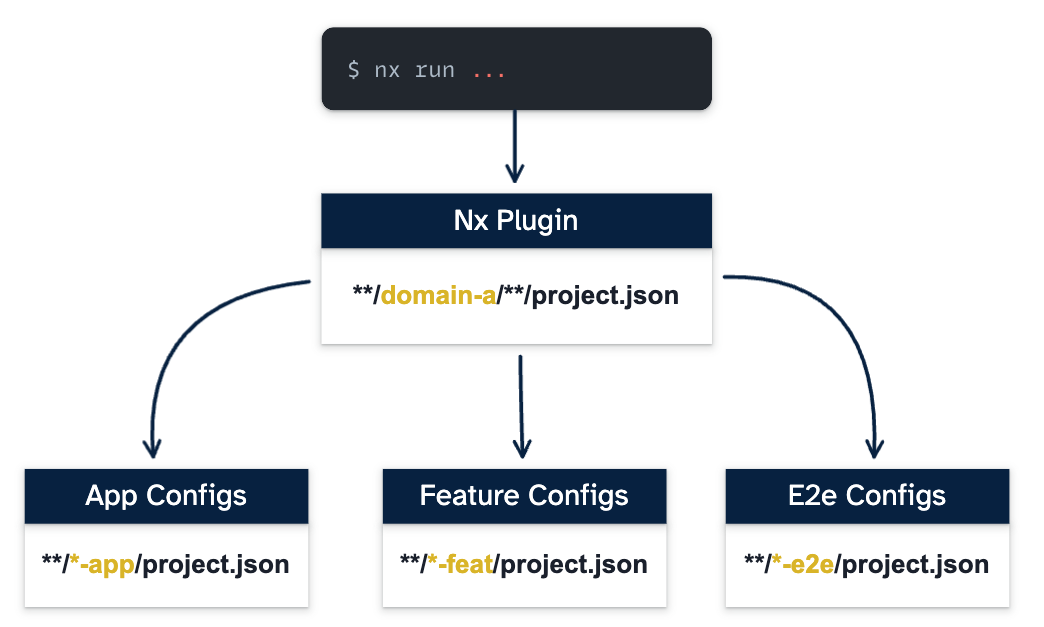
Check the Tip 9. Create Reusable Utilities for Your Plugins for an implementation of that approach which is using the combinePattern utility provided by Nx.
Another alternative is using Tip 4: Use a Simple File over an Nx Plugin.
6. List Affected Projects by an Nx Plugin
One aspect difficult to control is the number of projects impacted by one plugin, especially on large monorepos. In fact, some projects can be affected because they match undesired projects.
If you use the command nx show project [projectName], you'll see which configurations are generated by a plugin:

But if you want a global overview of affected projects by one plugin, for each plugin, you can add a tag related to that plugin.
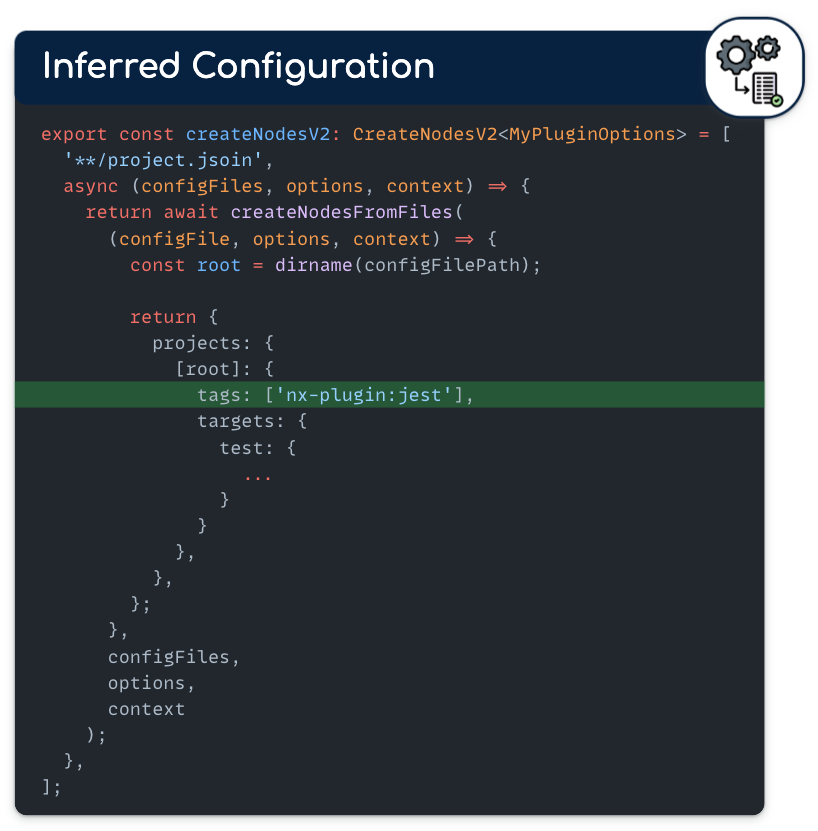
For example, you could add a tag nx-plugin:jest in you custom jest plugin.
Because a project can be affected by multiple plugins, you could have multiple tags.
Then, if you want to list all projects affected by one plugin, you can use the Nx command:
// list all projects affected by the plugin jest
nx show projects --projects "tag:nx-plugin:jest"

// list all projects affected by plugins
nx show projects --projects "tag:nx-plugin:*"
And then you can validate that the list of projects matches your expectation.
7. Explore Nx Core Plugins
This is a simple tip, but it taught me a lot. Reading the code written by the Nx team and exploring the Nx repository provides a lot of information on how you can structure or write your plugin architecture.
Mainly, the structure is always the same, and you can find the plugin implementations under packages/[packageName]/src/plugins/plugin.ts.
8. Use Multiple Layers of Nx Plugins
As mentioned in the previous tip, if you check the list of plugins in the Nx repository, you’ll notice they are organized by technologies.
However, an organization monorepo is often aligned with teams or products. Therefore, it makes sense to have multiple types of plugins tailored to the specific domains they serve.
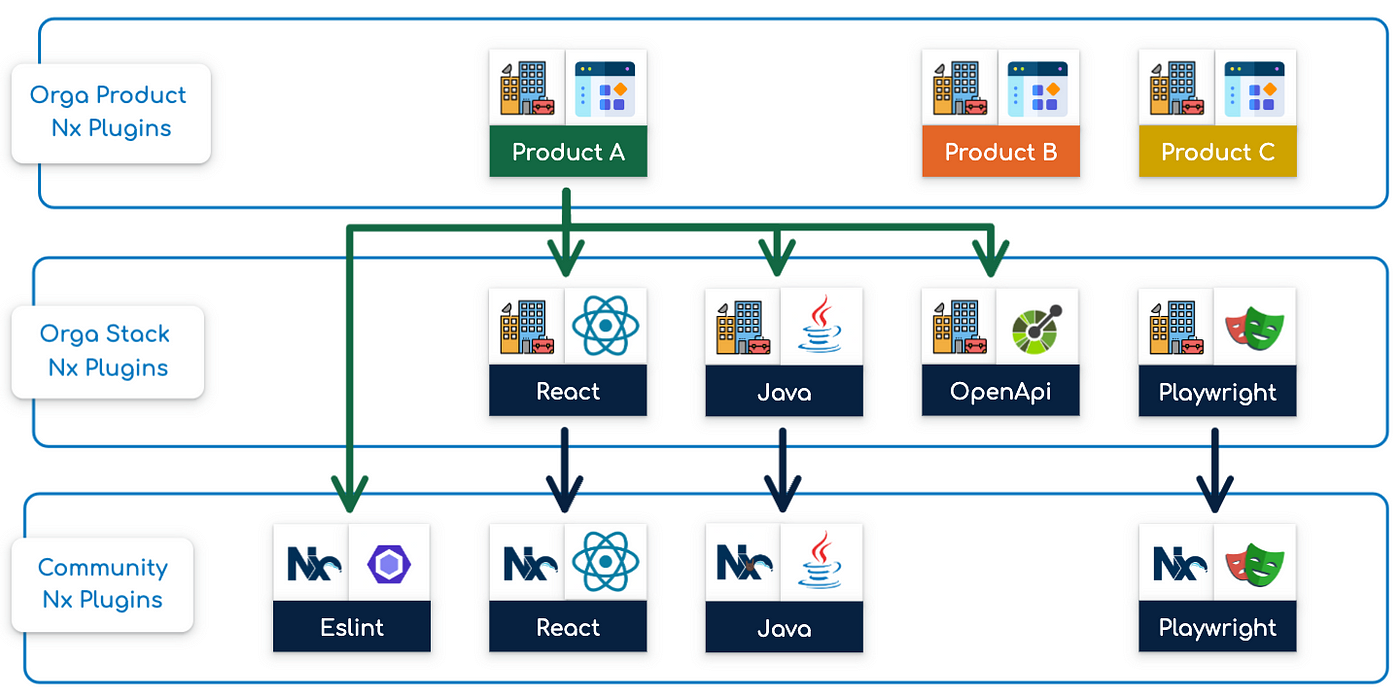
The First layer will directly use the Nx Plugins.
The second layer will specialized and extend existing plugins.
The layers above will group other plugins depending on the domains (teams/products/…).
You can find more details on the plugin architecture in my following article 🏘️ Poly Monorepos with Nx
9. Create Reusable Utilities for Your Plugins
Writing and maintaining utilities can be cumbersome, as many steps are often repeated multiple times. Utilizing utilities simplifies the implementation of your plugins and allows you to generalize default behaviors, such as adding a tag as described in Tip 6: List Affected Projects by an Nx Plugin.
Usually, I have one utility for generating the configurations:
import { dirname } from 'node:path';
import { CreateNodesContext, CreateNodesContextV2, CreateNodesResult } from 'nx/src/project-graph/plugins/public-api';
import { calculateHashForCreateNodes, ConfigCache } from './cache-config.utils';
import { isAttachedToProject } from './is-attached-to-project.util';
import { ProjectConfiguration } from '@nx/devkit';

export type GenerateConfig<T extends Record<string, string | number | boolean>> = (
  projectRoot: string,
  filePath: string,
  options: T,
  context: CreateNodesContextV2
) => Partial<ProjectConfiguration> | Promise<Partial<ProjectConfiguration>>;
export type WithProjectRoot<T> = (filePath: string, options: T, context: CreateNodesContextV2) => string;
export type SkipIf<T> = (projectRoot: string, filePath: string, options: T, context: CreateNodesContextV2) => boolean;
export type WithOptionsNormalizer<T> = (options: Partial<T>) => T;

export type CreateNodesInternal<T extends Record<string, string | number | boolean>> = readonly [
  projectFilePattern: string,
  createNodesInternal: CreateNodesInternalFunction<T>
];

export type CreateNodesInternalFunction<T> = (
  filePath: string,
  options: T,
  context: CreateNodesContext & { pluginName: string },
  configCache: ConfigCache
) => Promise<CreateNodesResult>;

export function createNodesInternalBuilder<T extends Record<string, string | number | boolean>>(projectFilePattern: string, generateConfig: GenerateConfig<T>) {
  let withOptionsNormalizer: WithOptionsNormalizer<T>;
  let withProjectRoot: WithProjectRoot<T>;
  const skipIf: SkipIf<T>[] = [];

  const builder = {
    withProjectRoot(fn: WithProjectRoot<T>) {
      withProjectRoot = fn;
      return builder;
    },
    withOptionsNormalizer(fn: WithOptionsNormalizer<T>) {
      withOptionsNormalizer = fn;
      return builder;
    },
    skipIf(fn: SkipIf<T>) {
      skipIf.push(fn);
      return builder;
    },
    build(): CreateNodesInternal<T> {
      return [
        projectFilePattern,
        async (filePath, options, context, configCache) => {
          // Normalize the options if a normalizer function is provided.
          options ??= {} as T;
          options = withOptionsNormalizer ? withOptionsNormalizer(options) : options;

          // Get project root from the file path. By default, take the directory of the file.
          const projectRoot = withProjectRoot ? withProjectRoot(filePath, options, context) : dirname(filePath);

          // Skip if one of the skipIf functions return true. By default, it should be linked to a project.json.
          const isNotAttachedToProject: SkipIf<T> = (projectRoot, filePath) => !filePath.includes('project.json') && !isAttachedToProject(projectRoot);
          const shouldSkip = [isNotAttachedToProject, ...skipIf].some((fn) => fn(projectRoot, filePath, options, context));
          if (shouldSkip) return {};

          // Compute hash based on the parameters and the pattern
          const nodeHash = await calculateHashForCreateNodes(projectRoot, options, context);
          const hash = `${nodeHash}_${projectFilePattern}`;

          // if config not yet in cache, generate it
          if (!configCache[hash]) {
            // logger.verbose(`Devkit ${context.pluginName}: Re-Compute Cache for ${filePath}`);

            // add by default a tag for the
            const pluginTag = `nx-plugin:${context.pluginName}`;
            const config = await generateConfig(projectRoot, filePath, options, context);

            configCache[hash] = {
              ...config,
              tags: [...(config?.tags ?? []), pluginTag],
            };
          }

          return {
            projects: {
              [projectRoot]: {
                root: projectRoot,
                ...configCache[hash],
              },
            },
          };
        },
      ];
    },
  };

  return builder;
}
And I also have a utility to facilitate combining multiple configurations:
import { createNodesFromFiles, CreateNodesV2 } from '@nx/devkit';
import { minimatch } from 'minimatch';
import { join } from 'node:path';
import { hashObject } from 'nx/src/hasher/file-hasher';
import { workspaceDataDirectory } from 'nx/src/utils/cache-directory';
import { combineGlobPatterns } from 'nx/src/utils/globs';
import { readConfigCache, writeConfigToCache } from './cache-config.utils';
import { CreateNodesInternal } from './create-nodes-internal-builder.utils';

export function combineCreateNodes<T extends Record<string, string | number | boolean>>(
  pluginName: string,
  createNodesInternals: CreateNodesInternal<T>[]
): CreateNodesV2<T> {
  const projectFilePatterns = createNodesInternals.map(([globPattern]) => globPattern);

  return [
    combineGlobPatterns(projectFilePatterns),
    async (files, opt, context) => {
      const options = opt as T;
      const optionsHash = hashObject(options);
      const cachePath = join(workspaceDataDirectory, `${pluginName}-${optionsHash}.hash`);
      const configCache = readConfigCache(cachePath);
      try {
        return await createNodesFromFiles(
          (filePath, nestedOpt, context) => {
            const options = nestedOpt as T;

            // find the nested create configuration based on the pattern
            const createNodesInternal = createNodesInternals.find(([globPattern]) => minimatch(filePath, globPattern, { dot: true }));

            if (!createNodesInternal) throw new Error(`No createNodesInternal found for ${filePath}`);

            const nestedCreateNodesInternal = createNodesInternal[1];
            return nestedCreateNodesInternal(filePath, options, { ...context, pluginName }, configCache);
          },
          files,
          options,
          context
        );
      } finally {
        writeConfigToCache(cachePath, configCache);
      }
    },
  ];
}
At the end, each plugin.ts looks like:
const normalizeOptions: WithOptionsNormalizer<PluginOptions> = (options) => ({
  buildTargetName: options.buildTargetName ?? 'build',
  testTargetName: options.testTargetName ?? 'test'
});

const createNodesInternalForApp: CreateNodesInternal<PluginOptions> =
  createNodesInternalBuilder<PluginOptions>('apps/domain-a/**/*-app/project.json', (projectRoot, filePath, options) => ({
    tags: ['scope:domain-a'],
    targets: {
      [options.buildTargetName]: {
        // ...
      },
      [options.testTargetName]: {
        // ...
      }
    }
  }))
    .withOptionsNormalizer(normalizeOptions)
    .build();

const createNodesInternalForFeature: CreateNodesInternal<PluginOptions> =
  createNodesInternalBuilder<PluginOptions>('libs/domain-a/**/*-feat/project.json', (projectRoot, filePath, options) => ({
    tags: ['scope:domain-a'],
    targets: {
      [options.testTargetName]: {
        // ...
      }
    }
  }))
    .withOptionsNormalizer(normalizeOptions)
    .withOptionsNormalizer(normalizeOptions)
    .build();

export const createNodesV2 = combineCreateNodes<PluginOptions>('domain-a-nx-plugin', [
  createNodesInternalForApp,
  createNodesInternalForFeature
]);
Of course these utilities should be adapted to your needs.
10. Project-centric or File-centric
There are two approaches for assigning configurations for a project:
File-centric
For each plugin, the pattern will match one specific file. You’ll have multiple plugin execution for each project:
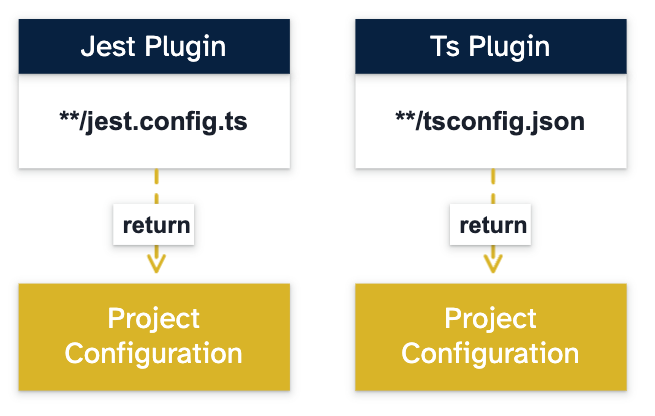
For example, if one project contains a jest.config.ts file and a tsconfig.json file, two plugins can generate a related configuration for that project. Then both configurations will be merged.
On large monorepos, this approach can have performance issue when running commands.
Project-centric
The pattern will match only the project.json or a structure that will allow you to generate the project only one time. Then the plugin will scan the files around that project to assign configurations.
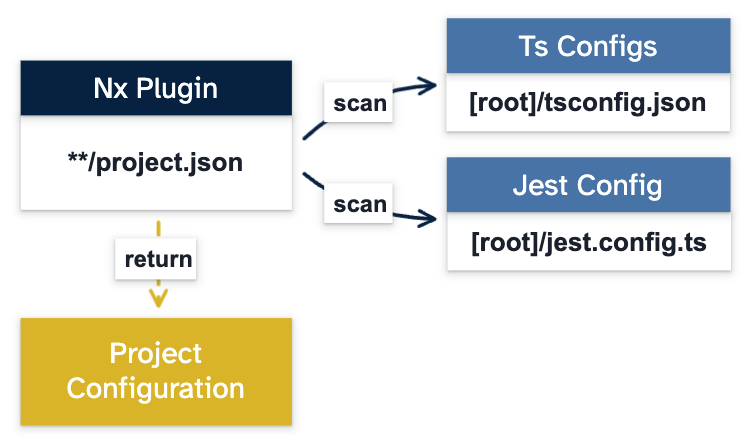
Choosing a file-centric approach or the project-centric approach depends on multiple factors, like the size of your Monorepo or the way your plugin is implemented.
Summary
Having an Nx plugin architecture can be highly beneficial for maintaining and unifying your code.
I hope this list of tips helps you feel more confident in making decisions and adapting them to create your Nx plugin architecture.
If you have additional tips or ask questions, feel free to contact me or book a call. More information is available on my website below 👇
Resources


